Monday, October 31, 2016

Have a Delightful Day

Hello, MarkerPOP friends! Hope you had a great weekend! I managed to set some crafting time in between all the kids' activities.

Today, I am working with the My Favorite Things'- Sweet Forest Friends. This is a fall stamp set, but I am pairing it up with a few different elements that help turn it into a winter set.


I am in love with the My Mind's Eye's Sugar Plum paper pad. The colors are so soft and pretty. Definitely, not your traditional colors! I loved the snowy print with deer in the background. I thought it would be perfect to create a scene card with it. I used a circle die to create the window on the front of the card. I designed the scene in layers. To create the layers, I used birch tree dies and a snowy hill die. The deer image is colored in with a few markers using the no-line technique. The deer is cut out with a coordinating die and attached to the card with a simple sentiment. To finish the card, I add a few enamel dots and a few white spots on the deer using a white gel pen.

_

The following markers are used to color in the deer: Chameleon - BR2 and NU3, along with the black detail pen.


 Thank you for stopping by today!


Friday, October 28, 2016

Pink & Main + DCWV Blog Hop

Hello, crafty friends! I am excited to be playing along with both DCWV and Pink & Main is this fun Fall Hop. I have the pleasure being on both companies design teams. It is so cool to pair them together for this fun event. You should be arriving from Lisa's blog, but if you just happened upon this hop and would like to start at the beginning, go HERE.

Along this hop, the teams are working on a variety of fall projects. Below is a picture of the supplies I am using for my project. Look closely and you might see a sneak peek of a new Pink & Main product.


I am not a scrapbooker, although I have been doing more layouts recently, so I might have to stop saying that! I used a variety of prints from the DCWV Autumn Leaves 12 x 12 Stack.


I used Pink & Main's new oversized stitched oval dies to create the pumpkin. The new die set includes several different sizes. I also used the Scarecrow stamp set for the "pick of the patch".


I wanted to add a little extra detail, so I used the Hello word die and Banner Alpha stamp set to create the title of the layout.


Thank you for hopping along with us today. Make sure you leave a comment for your chance to win some awesome prizes! Your next step on the hop is the super talented Karen J.'s blog!

Wednesday, October 26, 2016

Happy Belated Birthday

Happy Wednesday, everyone! It is Jessi here and I am excited to step away from holiday cards and show an everyday card with you today.

Today's card is using the super cute, WPlus9's Friends for All Seasons: Fall.


I love my ZIG Clean Color Brush markers. They are so easy to work with. I decided to use them in a careless way today. I stamped the images in black ink and let the ink dry completely.


I used a variety of ZIG Clean Color markers to color in the scene. I did not want the color to fully cover the image, so I left uncolored parts throughout the scene. Once the watercolors were dry, I used a fun die to cut of the scene. The scene is attached to a printed paper and mounted onto a card base.


Please stop by my MarkerPOP post for a list of supplies.

Thank you for stopping by today!

Saturday, October 22, 2016

Prepping My ADORNit Planner

I am planning to make some changes in the upcoming New Year. One of those changes is to be better organized. With all the activities that my family is involved in, it is time to get a planner in place and used! I was super excited to see the ADORNit planner they sent me for being an ADORNit Ambassador. They have a few different styles available, but you can find the one I have, HERE.

Here is the front cover of the Calendar Girls Planner: (I am still trying to figure out what I want to put in the banner...any suggestions?)


It is super cute that this planner even has a beautiful design on the spine of the planner! Could not let that go uncolored!


I LOVE the image on the back cover of the planner. I even colored this side first!


I used a variety of colored pencils to color the planner. But you can use paints, crayons, and markers. Whatever your heart desires! It does take awhile to color in the covers and spine, but it is so worth it when you see the final outcome!

So the next step in prepping my new planner is to color the monthly dividers that are included. I look forward to posting those once I am finished coloring them! Be sure to stop by to check them out!

Did you know the ADORNit has an Amazon store? Stop by and check out the selection available!

Thank you for stopping by and have a great day!

Jessi

Pink & Main Cocoa Kisses

Hello, Pink & Main friends! I apologize for the late post today. It has been a little crazy here and I finally had time to sit down and write this post. I am excited to share today's card with you. And now I am craving some holiday cookies!

Today I am using the Cocoa Kisses and coordinating dies:


I fell in love with the different cookie stamps included in the set. I wanted to make a card that highlighted the images. I decided to use the no-line technique to color in the cookies. The cookies are stamped in a light brown distress ink. I colored in the cookie outline with the matching ink. I love that there are individual stamps to decorate the cookies. I used red, yellow, and green to decorate the top of the colors.


The stamp set also includes a fancy sentiment. I stamped this in green and used the matching dies to cut it out. At the last minute, I decided to add a fun gingerbread man. The image is stamped in a darker brown and colored in with distress inks. This image is also cut out using the matching die. I added a piece of twine as the final touch when assembling the card.


Thank you for stopping by today!


Friday, October 21, 2016

DCWV & Chameleon Blog Hop

Hello, DCWV friends! Today, I am teaming up with a few other design team members from DCWV and Chameleon for a super fun Friend Friday blog hop.  If you are not familiar with Chameleon Markers, you can check them out HERE!

I was super excited when I learned about this blog hop. I love my Chameleon markers and have been using them for a while! I was excited to try out some new colors. I received their Color Tones Skin Tone set to play with. I knew exactly what stamp I wanted to use! So it was time to pair it up with some beautiful DCWV paper!


I decided to pair up the Chameleon markers with the DCWV Happy Day Stack. To start the layout, I stamped the image onto different cardstocks and prints to paper-piece the image together. I used the markers to color in the image.  I wanted the layout showcase a lot of the prints from the stack, so I created several layers using the different prints.


I used simple, gold alpha stickers to create the title of the layout, I wanted to highlight the gold accents throughout some of the prints.


Please stop by the DCWV blog and the Chameleon blog to see some more amazing creations created for this blog hop!

Thank you for stopping by and have a great day!

Jessi

Wednesday, October 19, 2016

Merry Christmas Tag

Hello, MarkerPop friends! It is Jessi here today. I am excited to share with you my latest project. I paired up a couple different stamp sets with a super adorable paper pad for today's project.

I decided to take a step away from cards and create a tag. I used the C.C. Designs Layering Tag dies and My Mind's Eye's Sugar Plum to form the tags.


I used one of the deer images from the Avery Elle's North Pole Pals stamp set and colored it in with Chameleon markers. The image is then cut out and attached to the front of the tag. A simple sentiment is formed from the Lawn Fawn's Frosty Fairy Friends stamp set and attached at the bottom of the tag. To finish the tag, a hole is punched at the top and twine is insert. The tag is now ready to be added to the perfect gift!
 

You can hop on over to the MarkerPop blog to learn more about the markers and supplies used on today's project.


Thank you for stopping by today! Have a wonderful day!

Monday, October 17, 2016

Joy Clair's Merry Christmoose

Hello, Joy Clair friends! It is Jessi from the design team. I hope you had a wonderful weekend! I actually had a little time to sit down and get crafty. That is always a great way to spend the weekend!

Today, I have a couple projects to share with you.
I am showcasing two of the newest Joy Clair stamp sets.

First up, is the Merry Christmoose stamp set:


Next up is a project using the Away in a Manger stamp set:


Want to learn more about my projects? Hop on over to the Joy Clair blog for the details!

I hope you enjoyed the projects you saw today and feel inspire to give it a shot! We would love to see your Joy Clair creations! You can even share them in our Joy Clair Facebook Group, HERE.

Thank you for stopping by and have a wonderful day!

Jessi

Saturday, October 15, 2016

Dear Santa

Happy Saturday, Pink & Main friends! Today we are suppose to reach 90 degrees here in my part of Texas. So I declare today a good day to dream of snow. And the closest I am going to get to that is to work with some of Pink & Main's winter stamp sets!

For today's project, I am working with Santa Mail and Oh, Deer stamp sets:


I wanted to create a fun scene using one of the elf images. The image is stamped onto white cardstock. I also stamped the same image onto a masking sheet. The image is cut out of the masking sheet and placed on top of the image on the cardstock. I used a distress ink to create the sky coloring. Once I was done, I peeled the masking piece off. The image is colored in using colored pencils. I also added a snowy hill below the image, using the Scalloped Waves dies. I also used the Stitched Rounded Rectangles die to cut out the scene. The scene is attached to a kraft card base. I also added a few clouds to add more detail to the scene. To fill in the empty space, I used the snowflakes from the Oh, Deer stamp set and stamped around the scene. A simple sentiment is stamped at the bottom of the card.


Thank you for stopping by today! Have a great one!

Wednesday, October 12, 2016

Thinking of You - Polar Bears

Hello, everyone! It is Jessi here with you today. I am excited to share with you the card I created using the super fun, Polar Bear stamp set from Poppystamps. If you are new to Poppystamps, check out the selection available in the MarkerPop store.


To create this scene card, I started the card base with a variety of blue prints. I attached them onto the front of the card base. Snowy hills are made using white cardstock and Pink & Main's Scalloped Waves border dies. The polar bears are stamped in black ink onto white cardstock. I used a light grey and colorless blender to create the shadows onto the bears. The iceberg image is stamped in gray ink and also shadowed with a gray marker. The simple sentiment is stamped at the bottom of the card.


Thank you for stopping by today!

Jessi

Saturday, October 8, 2016

Pink & Main's Christmas Script

Hello, Pink & Main friends! I have been working on Christmas cards for the last few weeks and I love creating them using non-traditional colors!

Today, I am working with the new Christmas Script stamp set and coordinating die.


I started off by picking a 6x6 paper pad that was full of awesome prints. The entire pad was full of non-traditional prints, so it super easy to mix 'n' match the prints. Using one print, I covered the card base by attaching the paper with tape. I cut out a printed strip to place across the card. I wanted to use this strip to highlight the sentiment of the card. I had a glitter paper that matched the prints. I used the glitter paper with the 'Merry Christmas' word die. The words are attached on top of the printed strip. I wanted to add a little more to the sentiment, so I stamped the rest on a different striped print and added to the card. To fill in some of the empty space, I used a punched out star.

Do you love to play along with card challenges?
We would love for you to hop on over to the Pink & Main Challenge blog and join in this month's challenge! Cannot wait to see your creations!!!

Thank you for stopping by!

Thursday, October 6, 2016

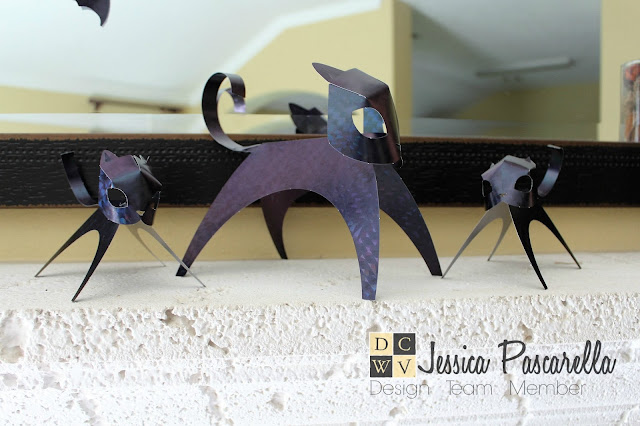
DCWV Hats, Bats, Cats...Oh, My!

Hello, friends! It is Jessi from the DCWV Social Media design team. It is October! When it comes time to decorating the house, this is the month that I get confused on how to decorate! Do I do Fall or do I bring out the Halloween? I used to decorate for Halloween two weeks out. However, the home décor is getting cuter and cuter and hard to resist!

When I saw the DCWV Hats, Bats, Cats Project Stack, I knew exactly how I wanted to use part of the stack.


DWCV project stacks are awesome to work with. The projects take no time at all to complete. All you need to do is pop the pieces out and assemble. Let's start with the bats.


The stack includes several different sizes of bats. You pop the bats out of the stack and fold along the crease lines. You can do some many things with these bats. I taped them to a mirror. You can tape them to walls and doors. They can even hang from the ceiling fans and swirl around in the breeze.


Next up are the cats. The cats are super easy to create, but do involve some gluing. To start, you pop out all the pieces. Complete the cat's head by fold and gluing along the creased line. It is time to attach the head to the body. On the sheet , there are two strips of paper. The short on is used to attach the head to the body and the longer one is for the tail.

So if you are in need of quick decorations for your Halloween party or want to decorations that look super cool, you can find the Hats, Bats, Cats Project Stack at JoAnn Stores.

Thank you for stopping by and have a wonderful day!

Jessi

Wednesday, October 5, 2016

Memory Box- Christmas Botanicals

Hello, everyone! It is Jessi here today! Making Christmas cards is getting me ready for the upcoming holiday season? It is not too early to start of those cards, right?

Today,, I am showcasing the super adorable, Memory Box's Christmas Botanicals stamp set.


I was inspired by the wreath image included in the stamp set. I wanted to enlarge the wreath to where you only saw part of it on the card. I started with the leaf stem stamp and repeated the image a few times, forming a circle. I randomly filled in the empty spots around the leaves with the smaller stamps in the set. The leaves are colored in with a few greens. The poinsettia flowers are colored in with a mixture of red and brown. To finish the card, a simple sentiment is stamped on the bottom corner. The panel is then attached to the front of a card base.


Stop by my MarkerPop post for the list of supplies used on this card!

Thank you for stopping by today!
Have a great day!

Tuesday, October 4, 2016

Joy Clair's Under Construction Bible page and more

Hello, Joy Clair friends! It is Jessi from the Joy Clair Design Team. Did you see that we released some new stamps yesterday? If not, hop on over HERE to join in the October Release Blop Hop for your chance to win!

Today I am working with the new Color by Faith set, Under Construction.


My next project is showcasing the new Harvest Blessings stamp set.


Stop by the Joy Clair blog for more details about today's projects.

Are you interested in learning more about Joy Clair Stamps and have a place to be inspired? Join us on Facebook and our Facebook Group.

Thank you for stopping by!

Monday, October 3, 2016

Joy Clair October Release Blog Hop

Welcome to the Joy Clair October Release Blog Hop! Joy Clair is releasing some amazing new stamp sets today!


The design team has been working hard with some new creations to show the new sets off! You should be arriving from Martha's blog.If you are stopping by my blog and would like to start at the beginning, please stop by the Joy Clair blog.

Joy Clair’s October release contains four stamp sets, two everyday sets and two sets from their bible journaling line, Color by Faith!
All the stamps from this release will be on sale starting today.

Today I am showing off the new Color by Faith's Away in a Manger.


I love the CAS style, On my cards, scrapbook pages, and even my Bible pages. Today's page is very simple to re-create. I stamped the image onto the paper and colored in with colored pencils. The bible verse is stamped above Baby Jesus. This was what my original plan for the page was. However, I felt the page needed something else. I added the star image and colored a variety of yellows to show it shining. The page is complete with the date stamp.


Now let’s talk about the grand prize! There will be TWO winners from the blog hop. Each winner will receive $25 Joy Clair gift certificate. WHAT A PRIZE!!!
1. Comment on the Joy Clair blog and the blogs of each participate along the way!


You have until October 5th, 2016 at noon EST. The winners will be announced on October 30th.
Thank you for stopping my blog! Your next stop will be the talented Cornelia's Blog!

Be sure to visit each of the designers on this blog hop!

Saturday, October 1, 2016

Joy Clair October Challenge

It is October 1st! And what does that mean? Today starts a new Joy Clair Challenge! This month's inspirational photo is below. You can be inspired by the photo, the colors or both! 


For this challenge, I was inspired by the colors. To be honest, I am tired of fall leaves. Here in Texas, we don't get the pretty color changes. They go from green to brown pretty quickly.

I am using Joy Clair's Dream Big and Everyday Sentiments for today's card:


I stamped the dreamcatcher image in a navy ink. The feathers are stamped in a rosy pink, light blue and yellow inks. I used the same colors to fill in the beads inside the dreamcatcher. The dotted string is actually from the Bible Planner stamp set. I taped off the part that I needed and inked the rest. The dreamcatcher is cut out on a stitched rectangle die and attached to the front of a card base. The simple sentiment stamped in the same navy blue at the bottom of the card.

Now it is your turn to play along!

Rules-
Create a new card, bible journaling or project using the theme or photo inspiration of the challenge posted above.

  • Post your project on your personal blog or online gallery.
  • MUST directly link to the Joy Clair blog in your post. (Or entry will not count)
  • Add a direct link to your project using the InLinkz on the Joy Clair blog.
  • Projects must be NEW, no back linking, please.
  • Number of entries is unlimited.
  • Use of Joy Clair products is optional.

  • This challenge will go from today October 1st through October 29th.  One random entry will be chosen to win a $25 GC to Joy Clair. The winner will be announced October 31st with the winners of our October Blog Hop.


    Pink & Main October Challenge

    It is the first of October, which means...we start a new Pink & Main Challenge! This month's theme is Fall/Halloween.

    I brought out one of Pink & Main's sets from last fall, Scarecrows, for today's card.


    To start off this card, I stamped the scarecrow image onto watercolor paper. The image is then painted with a variety of colors. Once the paint dried, I used the Scarecrows coordinating dies to cut out the image. The die cut is then attached to a fun fall print on the front of a card base. A yellow strip is added towards the top of the card. The Hello die is used on a green print and attached to the top of the card. To spell out 'FALL", I used the Banner Alpha stamp set and cut out the word on a pendant diecut. The pendant is attached to the card to complete the card.

    We would love for you to hop on over to the Pink & Main Challenge blog and join in this month's challenge! Cannot wait to see your creations!!!